
When farming began in the United States over 200 years ago the available land was vast and untapped. When a farmer depleted his farm’s soil nutrient level, he simply cleared land and started a new one. Most had 3 farms in their lifetime. Of course that option has long passed, and we need to be conscious of our garden’s soil structure and the replenishment of nutrients. The US loses one inch of topsoil every 16 years. Left to nature it would take 150 years to replace the loss. Soil blows and washes away without protective covering crops. Years ago farmers became dependent on chemical fertilizers, herbicides and machinery to increase their yield. The results of such practices have left Iowa with half its topsoil gone. In Ohio farmers lose 2 bushels of topsoil for every one bushel of corn produced. This is why food products must travel great distances to reach us. In 1976 the average supermarket carried 9000 items. Today it’s 30,000, and the average product comes from 1300 miles away! Want more news? If you picked a cup of spinach from your backyard garden in 1960, you now must consume 12 cups of supermarket purchased spinach to equal the nutritional value.
“Why We Garden”……..Jim Nollman
So what does this have to do with no till gardening? The previous examples show what becomes of our soil unless change is made. We need to think about growing our soil as well as growing dahlias. By considering no till methods, you have the opportunity to radically improve the quality of your garden. Want side benefits? How about no weeds, less water, saving your back, no machinery, and no chemicals! When I first learned to grow dahlias it was common practice to eradicate every living creature that came near our plants. Some growers had a stockpile of chemicals worthy of an US invasion, and it was suggested to spray, spray, spray. But we’ve come a long way over the years to better understanding integrated pest management and organic growing. Before we delve into making a no weed, no till garden we need to understand a very important aspect of it -the soil food web.
Ah yes, the soil food web! This term refers to what is going on below the surface of our soil. Believe me there is a war going on down there if your soil is alive. This war of eating and being eaten is what provides the nourishment all plants need—most especially our dahlias. Think of it as a food chain but underground where we can’t see it. If you are interested in this war I would recommend Jeff Lowenfell’s book “Teaming with Microbes” this book will provide an easy to understand introduction to the Soil Food Web. Just a little background as to how I came to the land of organics. After the show season a few years ago I was reflecting and checking my notes for the past show season. I was not pleased with my dahlias the last few years and even after winning a number of head table awards I was sure the dahlias should have been bigger and more colorful. Frustration increased. I had used just about every combination of chemical fertilizer and jumped at any new chemical that promised to kill all of my pests and take care of all fungus. Still, critters continued to attack my blooms, blooms that had grown larger in the past. While perusing a garden magazine, I espied a book advertisement: “Teaming with Microbes” a gardeners guide to the soil food web by Jeff Lowenfels and Wayne Lewis. The ad appealed to me and I purchased the book. Upon reading it, a new world opened. The subject of soil biology became more understandable and logical. Jeff and Wayne had simplified a complex subject for gardeners like me. Consequently, I decided to test ORGANIC growing methods. I divided my dahlia garden into two parts, growing half the organic way, and the other half the old fashioned way. This research after just one year changed my approach to dahlia growing. I found that I could grow prize-winning dahlias the organic way and at the same time revive my soil. The results truly surprised and were most gratifying.
So lets take a quick look at some of these warriors of the soil.
First we can start with bacteria. Bacteria are crucial to lives of plants. These guys are really small—just think about 250,000 can fit on the head of a pin. They are the primary decomposers of plant waste material. There are two main groups of bacteria. Anaerobic that can live without oxygen. These will destroy the inside soft tissue of decaying matter—this cause the stink, think rotten eggs. Aerobic bacteria are the ones we want in our soil. Think the good smell of earth.
Next let’s take a look at FUNGI. Again there are good fungi and bad fungi. A healthy soil will only allow the good guys. Fungi grow from spores into tread like structures called hyphae. These guys start from near the roots and can grow many feet into the ground —bringing the good food to the roots. Tilling the soil will break up these hyphae and they die. Some fungi produce antibiotics that kill pathogens in the soil—think penicillin. Fungi like bacteria play crucial roles in the soil food web as decomposers, nutrient cyclers, soil structure builders.
The next level up is the Protozoa, Amoebae, ciliates and flagellates. These guys are the big eaters and their waste adds to the nourishment of our soil.
Next step up on the soil food chain are the Nematodes. These guys eat almost anything. They contribute to helping keep our soil clean and healthy. They are very specialized in the way they get to their food source and in this way help till our soil.
A few words about Arthropods—some of these are visible to the naked eye. Their main function is as shredder. They chew up organic matter in their constant quest for food, creating smaller pieces. This makes the litter easier for the little guys to attack and eat.
We now have arrived at the King of the Soil, the mighty earthworm. Without a healthy worm population your garden, lawn and plants will not be all they can be. Worms are eating machines. Worms can deposit a staggering 10-15 tons of castings per acre on the surface annually. This ability to increase the availability of nutrients without carting in tons of fertilizer is about as close to alchemy as one can get. In addition to providing the finest organic fertilizer, worms also are the best tillers of your garden. Their moving through the soil in search of the next meal provides waterways and breaks up tight soil. All this comes at no charge and no physical effort on your part. With all these benefits, isn’t it strange to count the gardener as one of the major predators of the earthworm? Rototilling and other mechanical methods of turning the soil destroy worm burrows and reduce or even destroy earthworm populations by cutting them up into pieces that don’t ever regenerate whole worms. And the gardener who uses chemical fertilizers is literally throwing salt on the wound: these chemicals are salts that irritate worms and chase them out of your garden. A noticeable worm population is a clear sign of a healthy food web community.
So there you have it the Soil Food Web of life that makes things grow naturally. So now lets take a look at how we create this new organic garden.
Teaming With Microbes…….Jeff Lowenfels & Wayne Lewis
Let’s talk about how we can create our new garden. The secret to the garden is a layering process, cover crops and mulch. Patricia Lanza published a book with a catchy title called Lasagna Gardening. Keep the image of lasagna in your mind as I describe how the layering process works. Ready to start cooking?
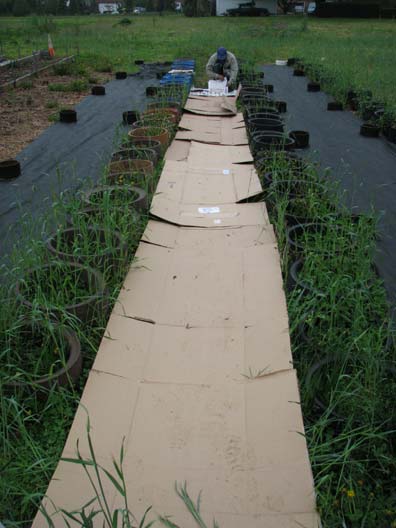
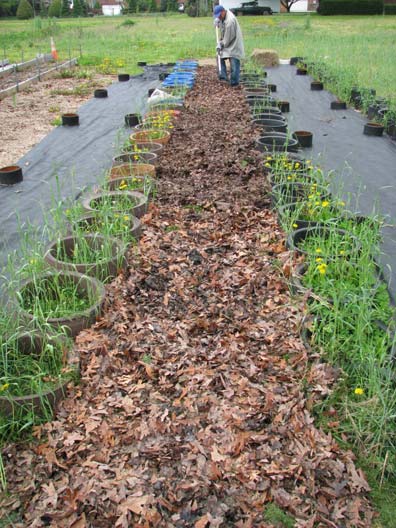
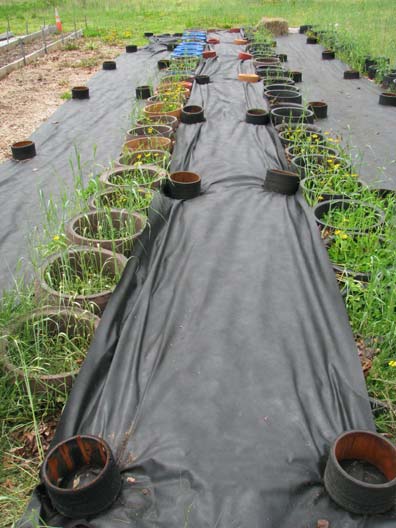
If you are making a brand new bed, it is not necessary to till the grass or existing weeds under. To create your dahlia garden the first step is to insert your stakes. I use 6’ metal fence poles available at Home Depot. They are green, usually with white paint on top. If you look down from above they are “T” shaped. The cost is about $6 per stake but they last a long time. I have many that are over 8 years old and still are in great condition. I do not remove them each year. Putting in stakes is a one-time event. See, you are saving work already! Do not make the bed wider than you can reach from any side. A width of 5 feet makes for easy access from either border, as it is very important these beds are never walked on. Now we can start to make the bed. Choose a day with little wind. For the initial layer we need to create a base to smother existing vegetation. You can use several layers of wet newspaper, or cardboard. Lay them close together so the edges overlap, making certain to completely cover the area. On top of this, add approximately a 3-inch layer of peat moss or compost. The following layer will be roughly 6 inches of mulch material such as ground leaves. Spring or fall is a great time to create a bed because we all have leaves, twigs, and branches available to utilize for this purpose. Chop the items with the lawn mower before using. Then keep stacking a layer of peat moss followed by a layer of mulch until the beds are about 18 inches high. If you have kitchen scraps, manure, or grass clippings, be sure to add them as you layer. They will jumpstart the soil improvement. If your garden soil requires a PH adjustment, now is the time to add lime or sulfur on the layers as you build. An option is to temporarily cover the completed beds with black plastic for three weeks. The trapped moisture and warmth of the sun will accelerate the bioactivity. Either way you will notice a marked reduction in the height of your lasagna within a few weeks. If you wish to plant right away, skip the plastic option, and simply use your hands to create a small depression, placing plants and a few handfuls of soil in the cleared area. The tilling of the area is now and forever the job of earthworms. There are two remaining aspects of the no weed, no till garden. That’s using proper mulch materials to suppress weeds, and choosing cover crops after dahlia season ends.
“Lasagna Gardening”….. Patricia Lanza
Mulch and cover crops can take many forms. I will just touch on a few that I have used and some I will be trying. It is very important that we understand in NO TILL __NO WEED garden the soil should never be uncovered. This is accomplished by heavy mulch in spring, summer and early fall and a cover crop in late fall, winter and early spring.
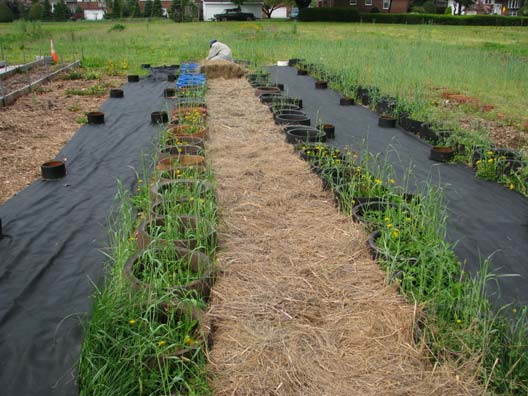
Some suggestions for mulch—ground up leaves—SALT HAY—Sweet Peat—grass clippings only if your lawn is grown organically—or any other organic material. The functions of mulch are too keep moisture in the soil, reduce heat in the hot summer and most importantly reduce the weed population.
WINTER COVER CROPS: Cover crops have several other advantages in that they help reduce soil erosion, rebuild soil texture and water retention, aid in loosening the soil, add organic matter, suppress weeds and some cover crops, like peas, clover and vetch actually add fertilizer in the form of nitrogen. These legume cover crops have the ability to capture the nitrogen in the air and fix it to their roots. When the plant dies the nitrogen is available for your dahlias to use. Cover crops should be sown while the weather is still warm enough for the seeds to germinate. Here in the northeast the cut-off date for seeding is usually set at about October 1st to November 1st. After that time the seed is apt to just sit dormant and not germinate until the next spring, at a time when you really don’t want these cover crops growing in your garden.
There are a wide variety of seeds that can be grown as cover crops. Among the most popular ones are Rye grain, Crimson Clover (strains), Garden Pea (strains), Vetch; Alfalfa, Oats, Buckwheat etc. These can be planted individually or they are often mixed and planted as a blend because of the various benefits the different crops offer.
Cover crops seeded in the fall will continue to grow all winter, whenever it is warm, and then will be ready to cut down just before planting time in early spring. One important note in a NO TILL NO WEED garden you would just cut down the cover crop and leave the tops lie on the surface of the garden, this will add additional organic matter and act as an additional mulch. The roots of the cover crop have tilled the soil and when they rot additional nutrients are added to your soil.
A No Till- No Weed garden is less work and much less cost than a conventional garden. We let Mother Nature do the tilling —fertilizing and weed control. It just doesn’t get much better than this! . Now it’s your turn ——–Are you ready to grow your soil?
Click images for a larger version:
 |
 |
 |
 |
 |
 |
– Tom Cleere & Steve Nowotarski